Advanced Shopify Integration
On this page you will find explanation on the advanced integrations of Expivi's 3D configurator.
Embedding 3D Configurator on Product Page
In the standard integration of the Expivi Shopify app, the original "Add to Cart" button is replaced with the "Configure" button. Clicking on the button will open a new page with the 3D configurator.
If you'd like to embed the 3D configurator on the Shopify product page, follow the instructions below.
These instructions are based on the Shopify Dawn theme. If you are using a different theme, the location of the mentioned code snippets might be different.
Step 1: Perform the Standard Integration Steps
Make sure you have performed all the steps explained on the Getting Started page.
Step 2: Add Custom Code to Page Header
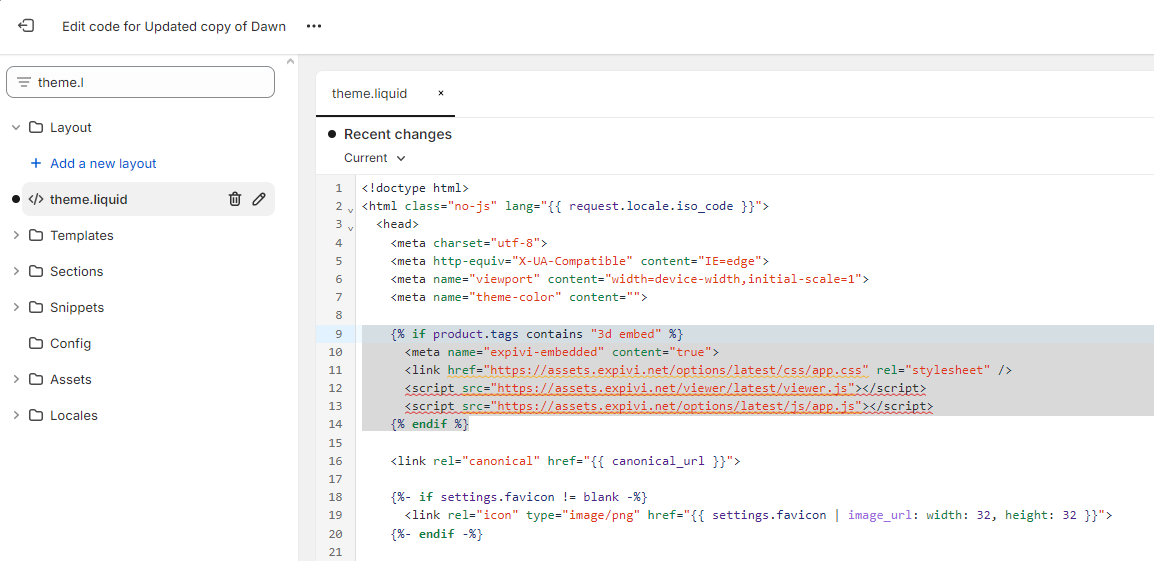
First we need to import the Expivi libraries in the head of the page and add the special meta tag. To prevent loading the libraries on all pages, we'll add an if statement to only include the libraries on product pages with the tag "3d".
Open the theme.liquid file and insert the following snippet in the head of the file.
{% if product.tags contains "3d" %}
    <meta name="expivi-embedded" content="true">
    <link href="https://assets.expivi.net/options/latest/css/app.css" rel="stylesheet" />
    <script src="https://assets.expivi.net/viewer/latest/viewer.js"></script>
    <script src="https://assets.expivi.net/options/latest/js/app.js"></script>
{% endif %}
The file should look like this
Step 3: Add Snippet to Theme Files
Create a new snippet in your theme files called expivi-embed.liquid and add the following code to this file.
<div class="expivi-single-product-container">
    <div class="expivi-viewer-container">
        <div id="viewerContainer"></div>
    </div>
    <div class="expivi-option-container">
        <div id="priceContainer"></div>
        <div id="optionsContainer"></div>
        <button class="btn expivi-add-to-cart" id="embedded-add-to-cart-btn" data-product-id="{{ product.id }}" data-url="/cart" data-expivi-save>Add to cart</button>
    </div>
</div>

<style>
    .expivi-single-product-container {
        display: table;
        height: 500px;
        width: 100%;
    }
    .expivi-single-product-container .expivi-viewer-container {
        display: table-cell;
        width: 64%;
        padding-right: 15px;
        vertical-align: top;
    }
    .expivi-single-product-container .expivi-viewer-container #viewerContainer {
        display: block;
        width: 100%;
        height: 100%;
        min-height: 100%;
    }
    .expivi-single-product-container .expivi-option-container {
        height: 100%;
        display: table-cell;
        width: 36%;
    }
    .expivi-add-to-cart {
        float: right;
    }

    @media (max-width: 600px) {
        .expivi-single-product-container {
            display: block;
            height: unset;
        }
        .expivi-single-product-container .expivi-viewer-container {
            display: block;
            width: 100%;
            padding-right: 0;
            height: 50vh;
        }
        .expivi-single-product-container .expivi-option-container {
            height: initial;
            display: block;
            width: 100%;
        }
    }
</style>
<script type="text/javascript">
    var apiToken = '{api_key}';
        window.expiviInstance = ExpiviComponent({
            catalogueId: {{product.metafields.expivi.product_id.value}},
            viewerContainer: "#viewerContainer",
            optionContainer: "#optionsContainer",
            priceSelectors: '#priceContainer',
            token: apiToken
        });
</script>
Replace {api_key} in the JavaScript code with the API key you have added in the API Key field on the Expivi app settings page.
The value of the catalogueId {{product.metafields.expivi.product_id.value}} will be explained in the next section.

Step 4: Installing Metafields App
For the value of the parameter catalogueId we recommend using a metafields app for this. Go to the official Shopify app store and install the Metafields Guru app. The free version has all the features you need.
If you are already using a different metafields app, the following instructions may differ.
Step 5: Add Metafield to Shopify Product
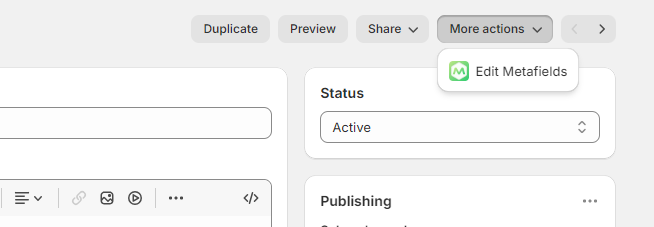
Go to the Edit page of the Shopify product that you connected with an Expivi product explained on the Getting Started page. In the "More actions" menu, click on
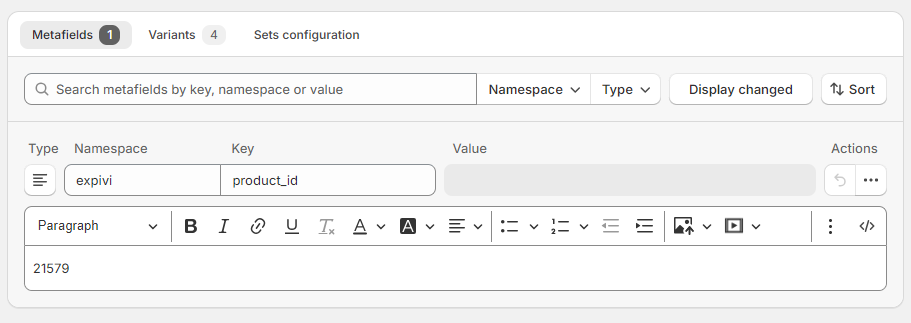
Click on the "Create metafield" button to add a new metafield. Enter expivi in Namespace field and product_id in the Key field.
Log in to your Expivi account and navigate to the Catalogue. Look up the product ID of the 3D product you've linked the Shopify product with.

Use the product ID as value for the metafield you create. Once the three values are added, save the metafield. The metafield should look like this:
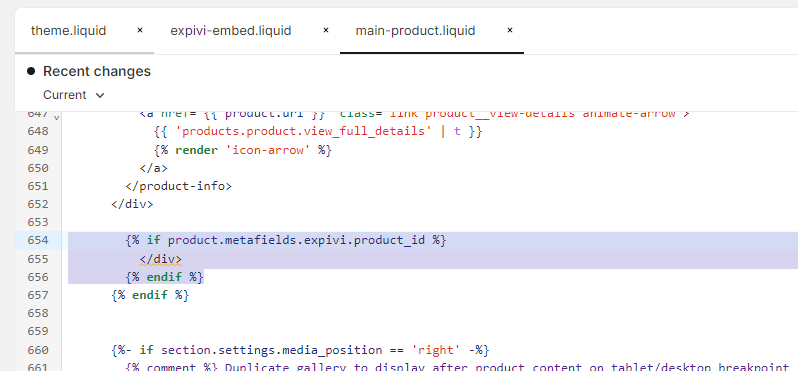
Step 6: Edit Product Template Theme File
These instructions are written specifically for the Shopify Dawn theme. The locations of the mentioned file and code lines may differ in other themes.
The final step is adding code to the product page template theme file, which displays the 3D configurator on the Shopify product page when a metafield with the product ID has been added to the Shopify product.
The 3D configurator will replace the original image gallery and right column of the Shopify store.
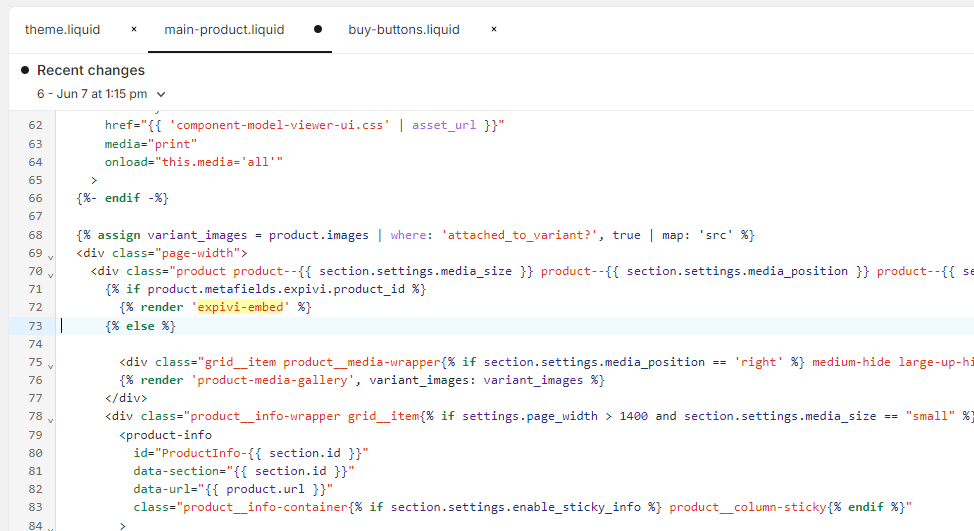
Open the main-product.liquid file in the theme editor and look for the part where the product section starts and implement the following code:
{% if product.metafields.expivi.product_id %}
    {% render 'expivi-embed' %}
{% else %}

  <!-- PUT THE ORIGINAL PRODUCT PAGE HTML HERE -->

{% if product.metafields.expivi.product_id %}
    </div>
{% endif %}
The code will look like this
Conclusion
When all steps are completed, open the Shopify product page and you will see that the 3D configurator is now integrated on the product page.
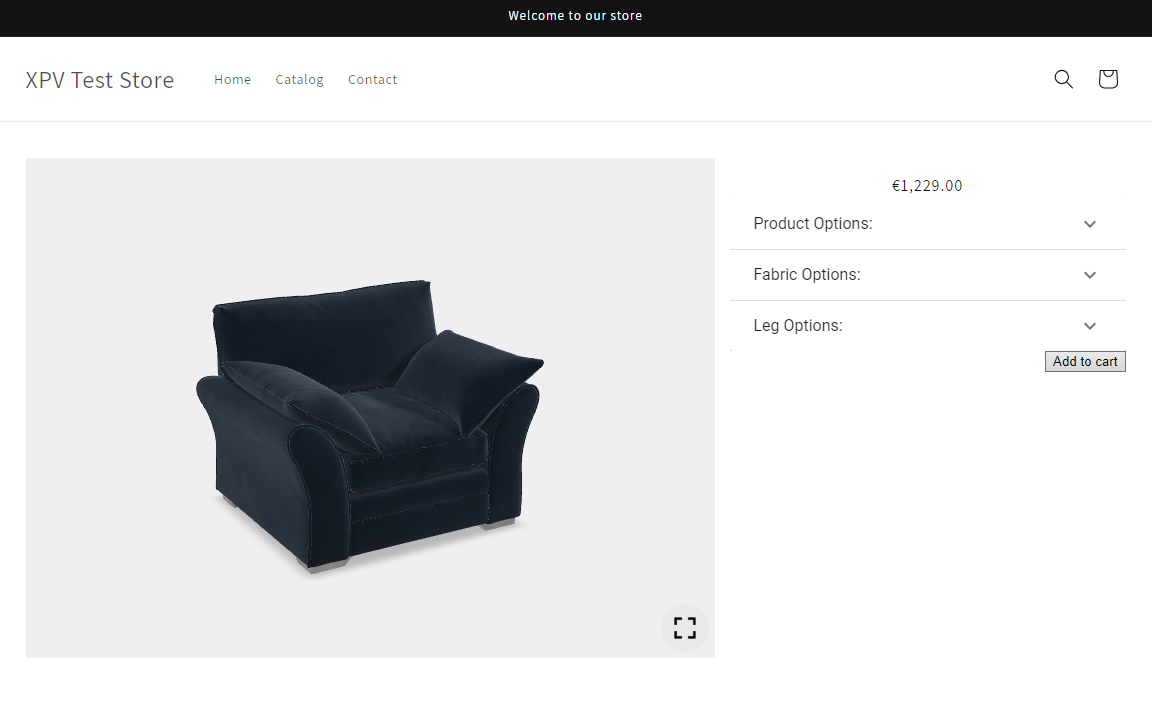
By applying custom CSS code, you can style the 3D configurator elements to reflect the brand's identity.