Global Configuration
In this section all app settings will be explained in detail.
General Settings
This section includes general settings of the Expivi Shopify app to change the plugin's behavior. You can find the shop settings and add to cart behaviours too.
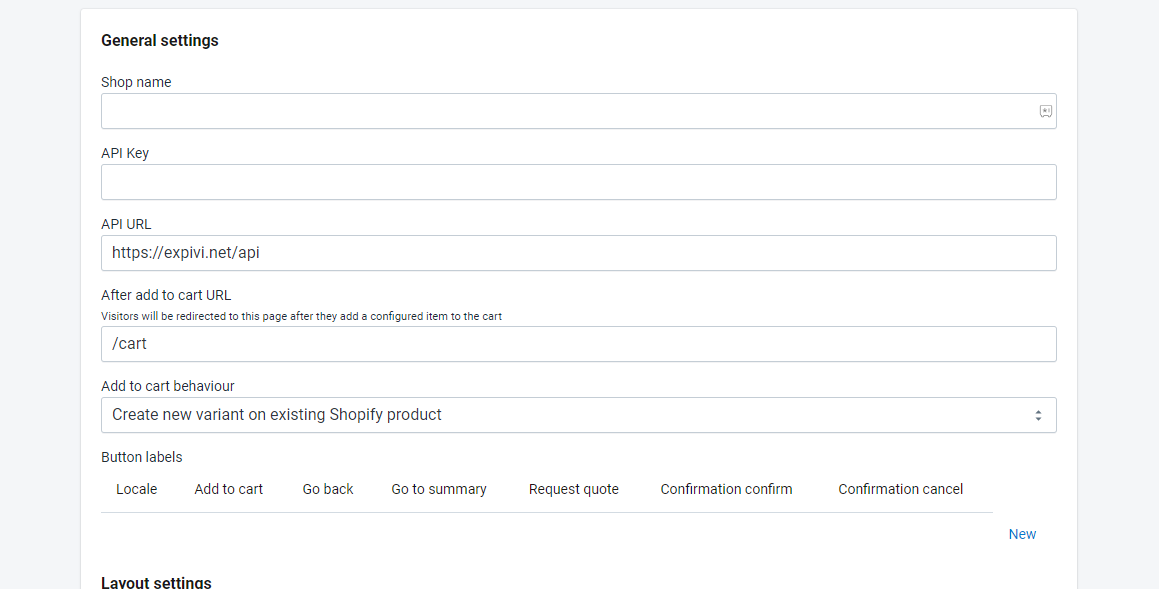
Shop Name
The name of your shop, which will be used in various places like on the summary page.
API Key
The API key is needed to create a connection between your Shopify store and the Expivi.
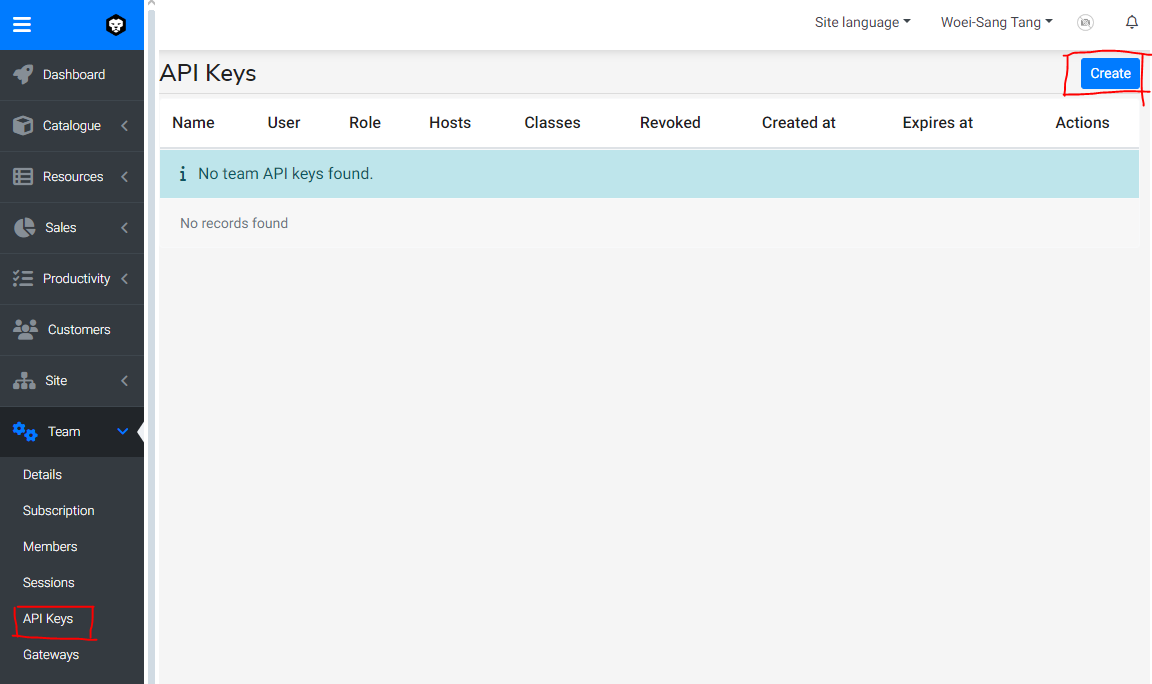
Log in to your Expivi account and navigate to Team > API Keys and click on the "Create" button in the top right corner to generate an API key.
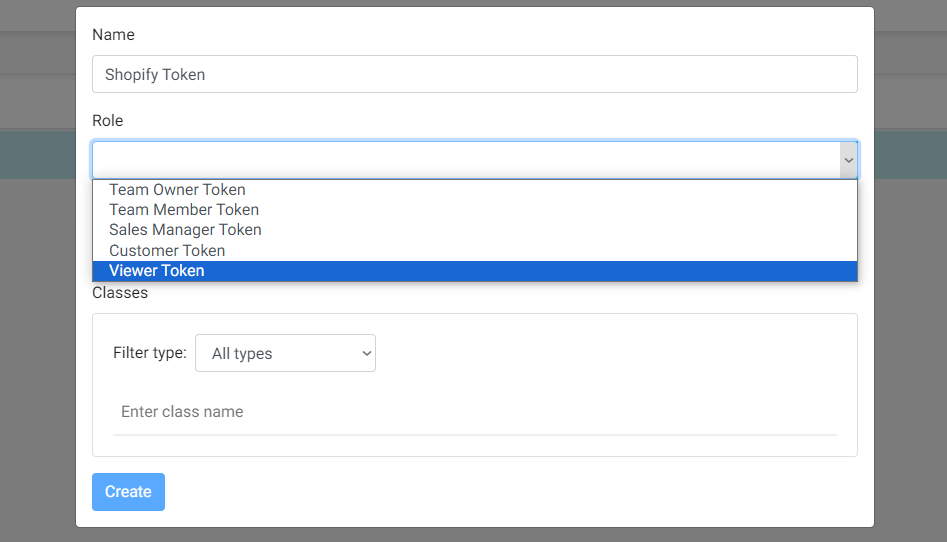
Give the token a descriptive name and make sure you choose the "Viewer Token" as Role. You may leave the Host and Classes at the default values and click on Create.
By entering the domain name in the Host field, it limits the use of the API token to this domain name. Don't forget to add the domain name of the Shopify admin area too (myshopify.com).
Example of the value for the Host field:
*.yourdomainname.com, *.myshopify.com
Copy the API key and paste it into the API key field in the Shopify App settings and click on the Save button.
The Expivi API key is only shown once. Create a new API key when you need one.
API URL
The API URL is needed to allow communication between Shopify and the Expivi platform.
The API URL should be https://expivi.net/api.
After Add to Cart URL
When a customer adds the configured product to the cart, they will be redirected to the cart page by default. Changing the value of this setting will change this redirection.
Add to Cart Behaviour

Shopify is a closed platform, which makes it impossible for third party developers to save necessary data in Shopify's databases. In order to save the configuration details whenever a customer adds the configured product to the cart, the Expivi app will either (1) create a new variant on the existing Shopify product or (2) create a replica of the Shopify product containing the configuration details.
If you expect your products to have a limited amount of variations, choose for the first option.
When choosing "create a new variant on existing Shopify product", for every new and unique configuration with a unique price, a new variant will be created in the Shopify product that is linked with the 3D product. This means that you have to take Shopify's variation limit in mind. Also, the price of an existing variant will not be updated when the price changes.
To learn more about Shopify's variation limit, visit this page.
When choosing "create an Expivi product replica for each configuration", a replica will be created of the Shopify product that is linked with the 3D product. The words "Expivi Product Replica" will be appended to the product name. This method will cause the catalog to fill up with product replicas and be shown in your Shopify store by default. A solution would be to add non replica products to a collection first and display only collections in your shop catalog.
Button Labels
If you have a multilingual Shopify store, you can translate the labels of the buttons used in the 3D configurator. Click on the "New" button to add a new language and make sure to enter the correct values for the "Locale" field. For more information on the correct language codes, visit this page.

Note: Translating attributes and options in the Expivi configurator can be done in the Expivi account.
Layout Settings
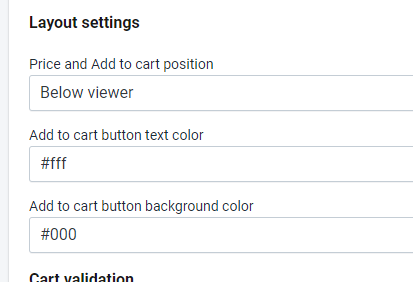
With the layout settings, you can change the position of the Price and Add to Cart button. You can also change the colors of the Add to Cart button, but this can also be achieved by editing the CSS file of your Shopify theme
Cart Validation

You can use this field to add custom scripts to validate the configuration, before adding it to the cart.
Confirmation Notification

You can use this field to add a confirmation message when a customer adds the configuration to the cart. A pop up will appear before adding the configuration to the cart.

Example of the confirmation message
Summary Page Settings
This feature makes it possible to show your customer a summary of the complete configuration first, instead of adding the configuration to the cart immediately. The call-to-action button on the configurator page will change to "Summary" instead of "Add to cart". This feature makes it also possible to allow your customer to request a quote instead of making a purchase.
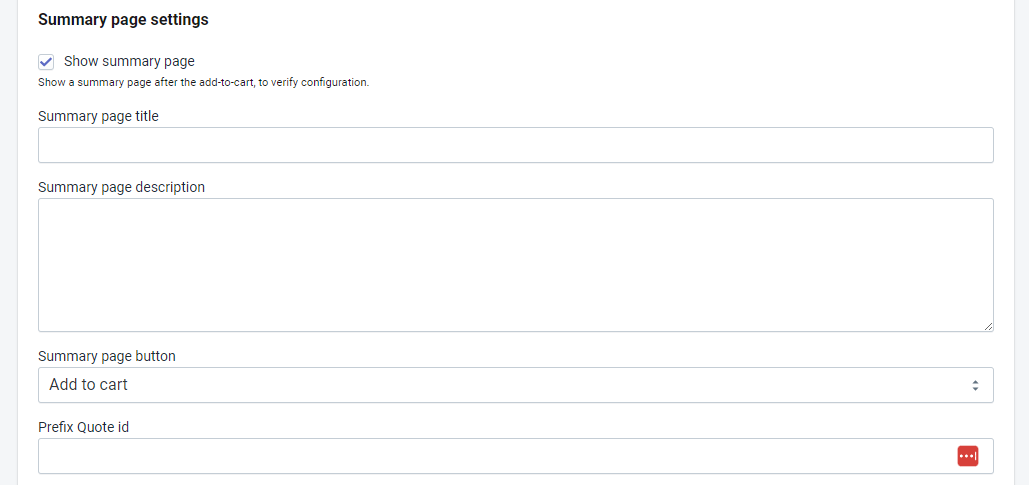
To enable this feature, check the "Show summary page" checkbox and click on the "Save" button. Extra fields will appear.
The values of the "Summary page title" and "Summary page description" fields will appear at the top of the page.
Summary Page Button

The call-to-action button on the summary page can be either "Add to cart" or "Request quote". When "Request quote" is chosen, a "contact details form" will be displayed.
Other Settings
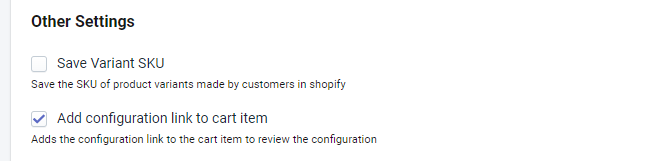
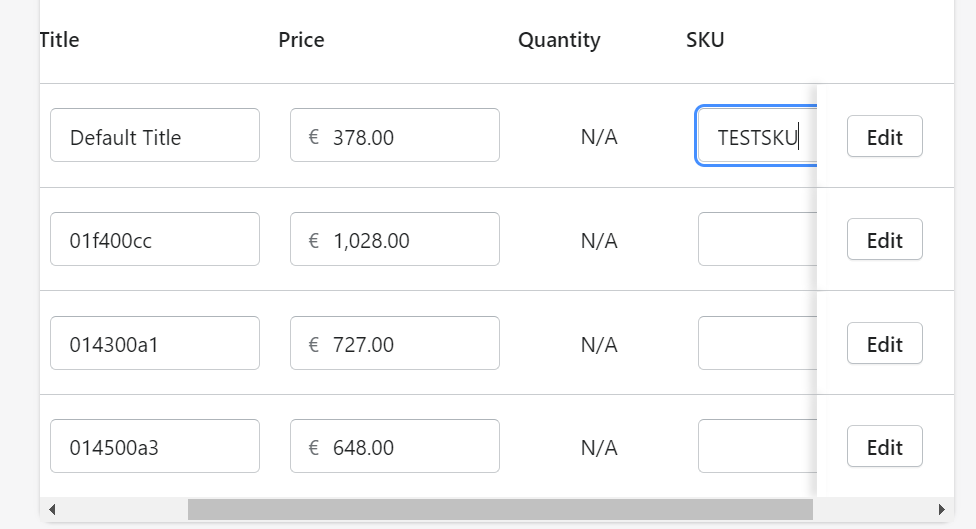
Save Variant SKU
When the "Save Variant SKU" is checked, the SKU of the main product is added to all the variations that will be created by the Expivi app.
This allows you to save the SKU in the generated variant. To enable this feature, it's needed to check the "Copy SKU" in the product settings of each individual product (find this settings by clicking on the edit button in the Product Connections section).
The SKU of the first variant in the product is used instead of the generated SKU.
This feature only works when Add to Cart Behavior is set to "variant".
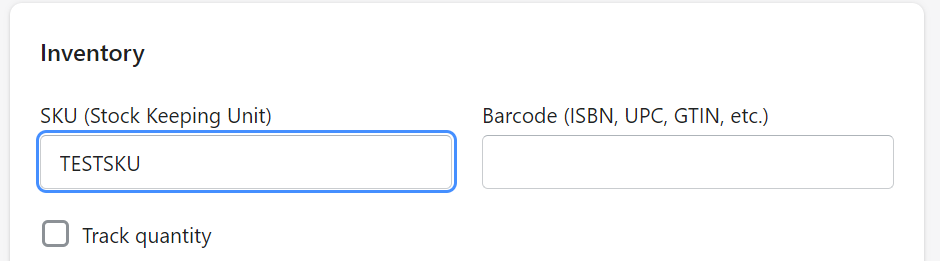
By default, it will try to generate a SKU based on the "SKU attributes" are filled in product settings. If this field is not filled (or incorrect values are used), the SKU will be empty.
To make sure that this functionality works properly you need to add a SKU to your main product, if you have not done that already. Go to the Edit page of the product, go to the Inventory section and add a SKU there.
If you already have been using Expivi and want to use this for every newly created variant, you have to add the SKU to the default variant (the first one in the list, usually named "Default Title").
New variants are created by the Expivi app based on price. When you want to apply the SKU to the existing variants, you can either copy this to every price variant or remove the existing variants so they are newly created with the correct SKUs.
Add Configuration Link to Cart Item
When this option is checked, a reconfiguration link will appear in the cart, so that a customer can review and edit the configured product. Keep in mind that when a product has been changed and added to cart again, it will be added to the cart as a new product in addition to the first product, instead of replacing the first product added to the cart.
Custom Email Configuration Settings

If you are using the "Request quote" feature mentioned before and you would like to use your own mail server, you can check the "Use custom email configuration" and enter the credentials for the mail server in this section.
Product Connections
In this section, you can create new connections between Shopify and Expivi 3D products and view existing connected products. Make sure that the Shopify and Expivi products are already created.
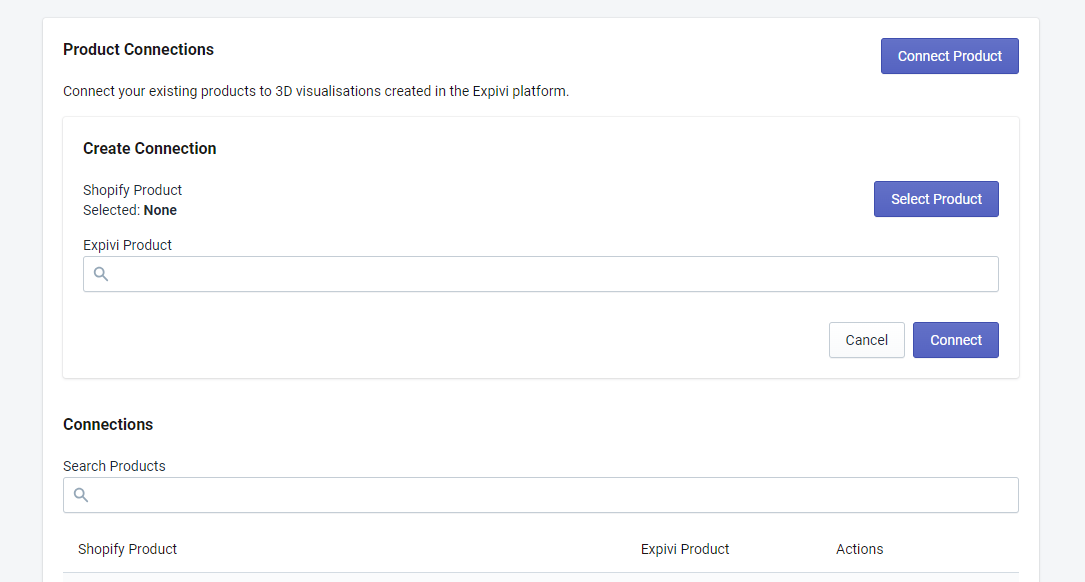
In order to integrate Expivi's 3D configurator with your Shopify products, we need to create a connection between a single Shopify product and an individual Expivi product. This makes it possible to use the same 3D product with multiple Shopify products.
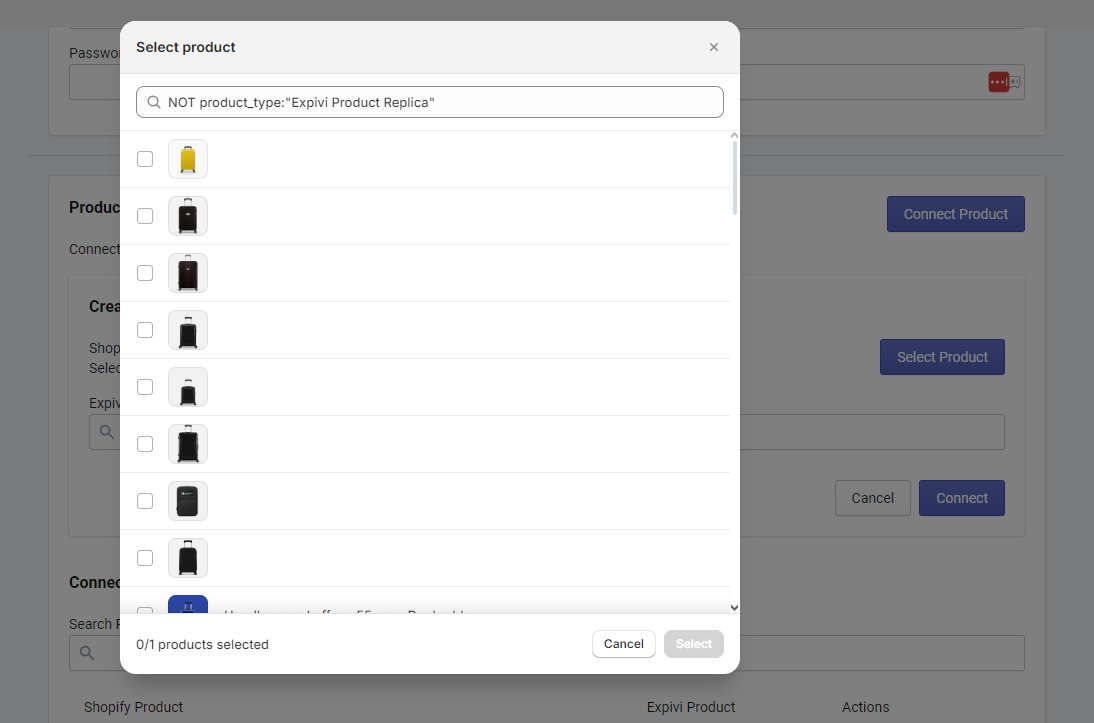
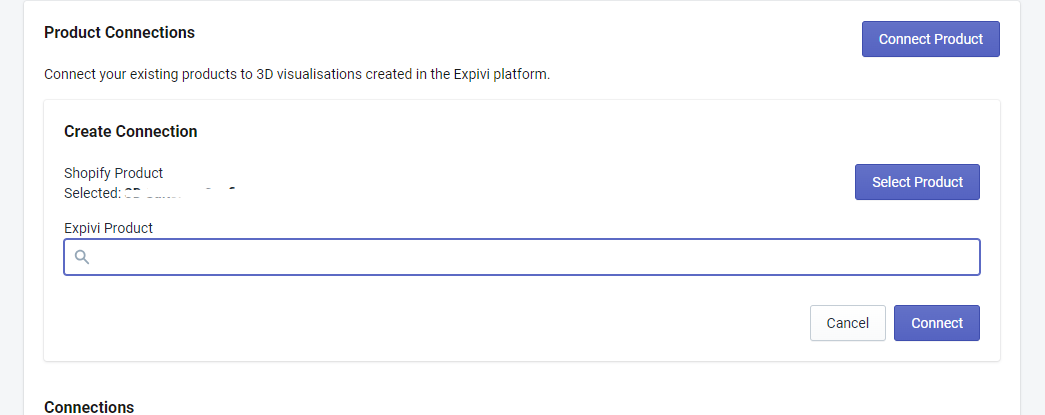
Go to the "Product Connections" section of the Expivi app settings, click on the "Connect Product" button and click on the "Select Product" button.
In the popup window, all existing Shopify products are listed. Choose the product you want to link the 3D product with and click on Select button.
In the Expivi Product search field, search the name of the 3D product that is already set up in your Expivi account and click on the Connect button.
When the products are linked, it will appear in the Connections list. Clicking on the "Preview" button (with the eye icon), will open the 3D configurator.
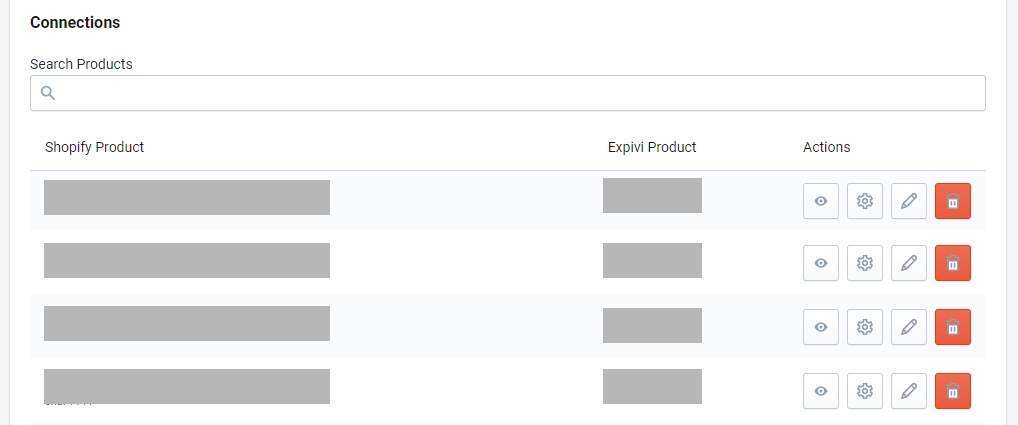
Connections
In the Connections section you will see all the products linked with each other.
Each connection has 4 action buttons: Preview, Configure, Edit and Delete
Preview Button
The "Preview" button will open the configurator without going to the Shopify product first. The URL that appears in the browser is also the direct link to this specific configurator (which is linked to the Shopify product). This makes it possible to use this direct link anywhere you want.
If your shop offers multiple currencies and languages, remember to include the necessary parameters in the direct URL.
Configure Button
The "Configure" button opens a new page with the 3D configurator. On this page you can create product images and a preset for the product configurator.
![Product configuration page buttons]](/img/integration/shopify-app/expivi-shopify-integration-307.png)
"Save image" button
The "Save image" button makes it easy to create product images for your Shopify product. First set the camera angle from which you would like to make the product image, then click on the "Save image" button to create the product image. This will automatically be added as product image to the Shopify product. Create as many product images as you want.
Note: there is no feedback when clicking on the "Save image" button. Everytime you click on the "Save image" button, a product image is created.
Creating a preset
On this page you can create preconfigured configurations (presets) for the product configurator. The chosen options will be loaded when the product configurator is loaded.
Select all the options in all the attributes that you want to be used for the preset. Click on the "Save" button to create the preset.
The next time you load the product configurator, the chosen options from the preset are loaded automatically.
With this method, you can link multiple Shopify products with the same Expivi product, and load specific options for each Shopify product.
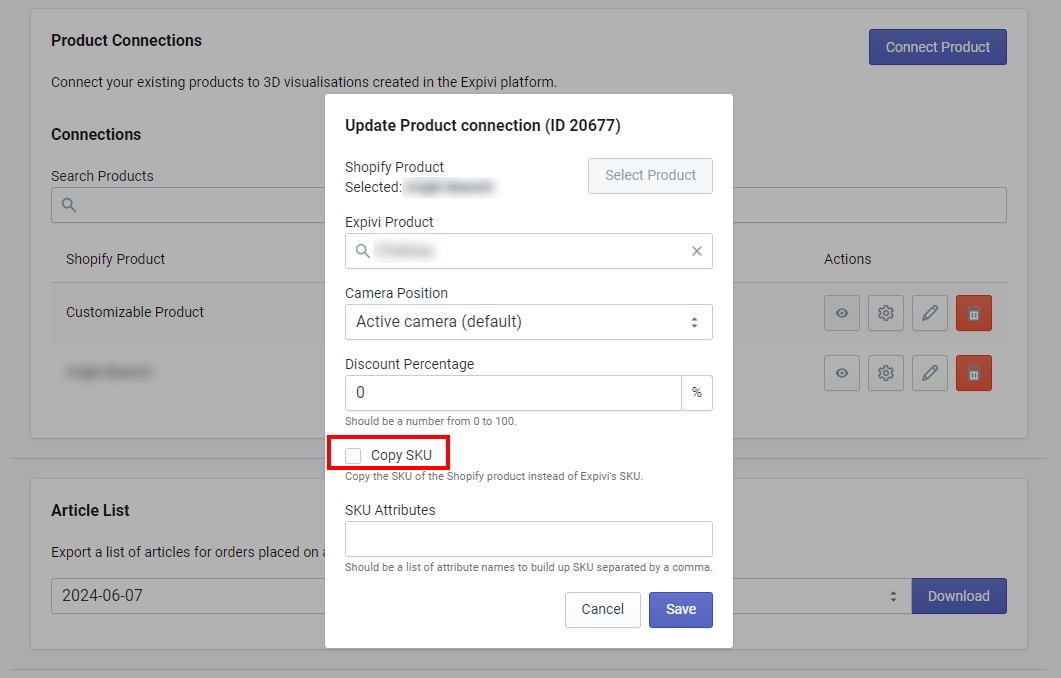
Edit Button
Clicking on the "Edit" button will display a pop up window to edit the individual connection.
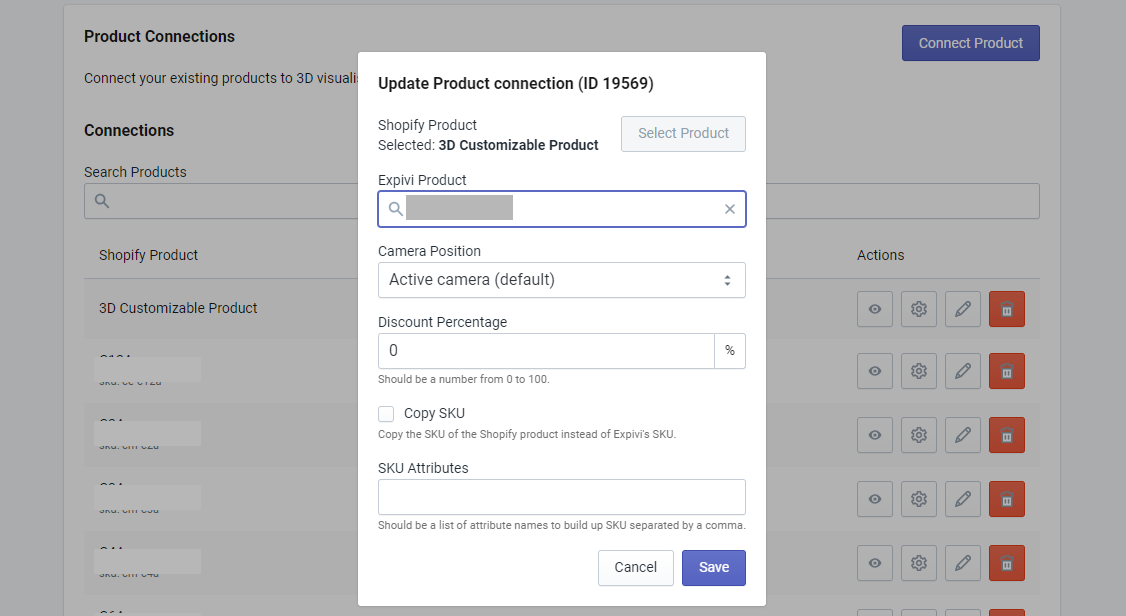
Expivi product
You can change the connected Expivi product by removing the linked Expivi product first and search for the Expivi product you want to link the Shopify product with.
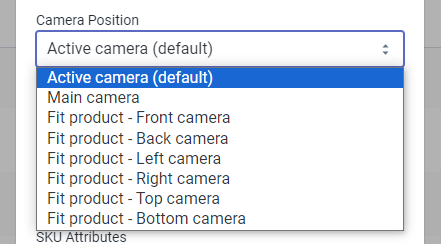
Camera position
Upon adding the product to the cart, a thumbnail is generated of the current configuration, which is also used as thumbnail in the cart and the rest of the checkout process.
You can change the camera position of the generated thumbnail by choosing a different camera position
Copy SKU
Checking this option will use the original SKU of the Shopify product instead of using a SKU created by the Expivi app.
SKU Attributes
It is possible to add a SKU as line item to the configuration details, based on the chosen attributes and its options.
First you add the keys to each option of each attribute in the Expivi backend.
An example: Attribute A, B, and C each has 4 options (1, 2, 3, 4)
The keys added to each option of Attribute A: A1, A2, A3, A4
The keys added to each option of Attribute B: B1, B2, B3, B4
The keys added to each option of Attribute C: C1, C2, C3, C4
In the "SKU Attributes" field you fill in Attribute A, Attribute B, Attribute C. When a configuration is added to the cart, there will be a line item with this dynamically created SKU, e.g.: A2B3C4
Delete Button
To delete a connection, click on the "Delete" button.
Article List

Use this feature to export a CSV file with a list of articles and its SKUs of all orders that are created on a chosen day.
Script Tags

Sometimes errors may occur due to conflicts with other scripts from other apps, or in some cases when Expivi releases a new update to the Shopify app. In those cases, you can try clicking the "Sync script tags" button.