Theme Customization
To integrate Expivi's 3D configurator with your Shopify store, it is necessary to add custom code to your Shopify theme files.
These changes are needed for:
- Replacing the Shopify standard "add to cart" button on the product page with a "configure" button to take the customer to the 3D configurator
- Adding configuration details to the product in the shopping cart
Optional changes for:
- Adding a reconfiguration link to the product in the shopping cart
- Fixing the uploaded image link in the order details
- Using custom fonts in the 3D configurator
For these instructions we have used Shopify's Dawn theme. The structure of the theme you are using might differ a lot.
Note: In these instructions we have added the product type "3d" to the Shopify product

Replacing the Add to Cart Button
The following modification to the theme file, will replace the original "Add to cart" button on the product page with a "Configure" button, which will take the visitor to the 3D configurator page.
The code will look if the product has the product tag "3d". If not, the original "Add to cart" button will be displayed.
The code
{% if product.tags contains "3d" %}
<a href="/apps/configurator?catalogue={{product.id}}&currency={{cart.currency.iso_code}}&locale={{request.locale.iso_code}}"
class="btn product-form__cart-submit">
Configure</a>
{% else %}
<!-- PUT THE ORIGINAL ADD TO CART FORM/BUTTON IN HERE //–>
{% endif %}
To have the "Configure" button look the same as the original "Add to cart" button, use the same CSS classes and selectors or copy the CSS code from the original button and apply it to the new "Configure" button.
Locate the theme file which contains the "add to cart" button code. In the Dawn theme, it is located in the buy-buttons.liquid file on line 78.
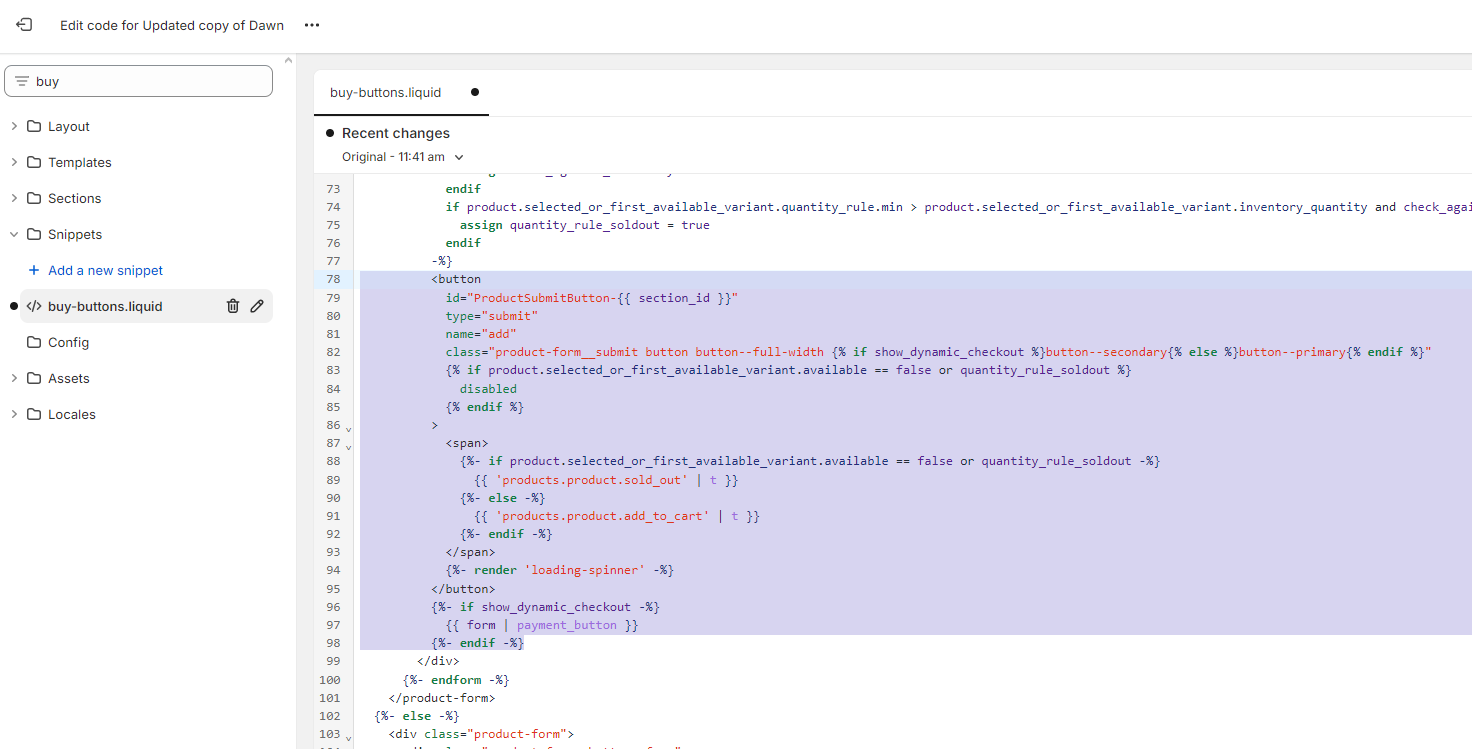
Integrate the code snippet in this theme file, and the theme file should look like this
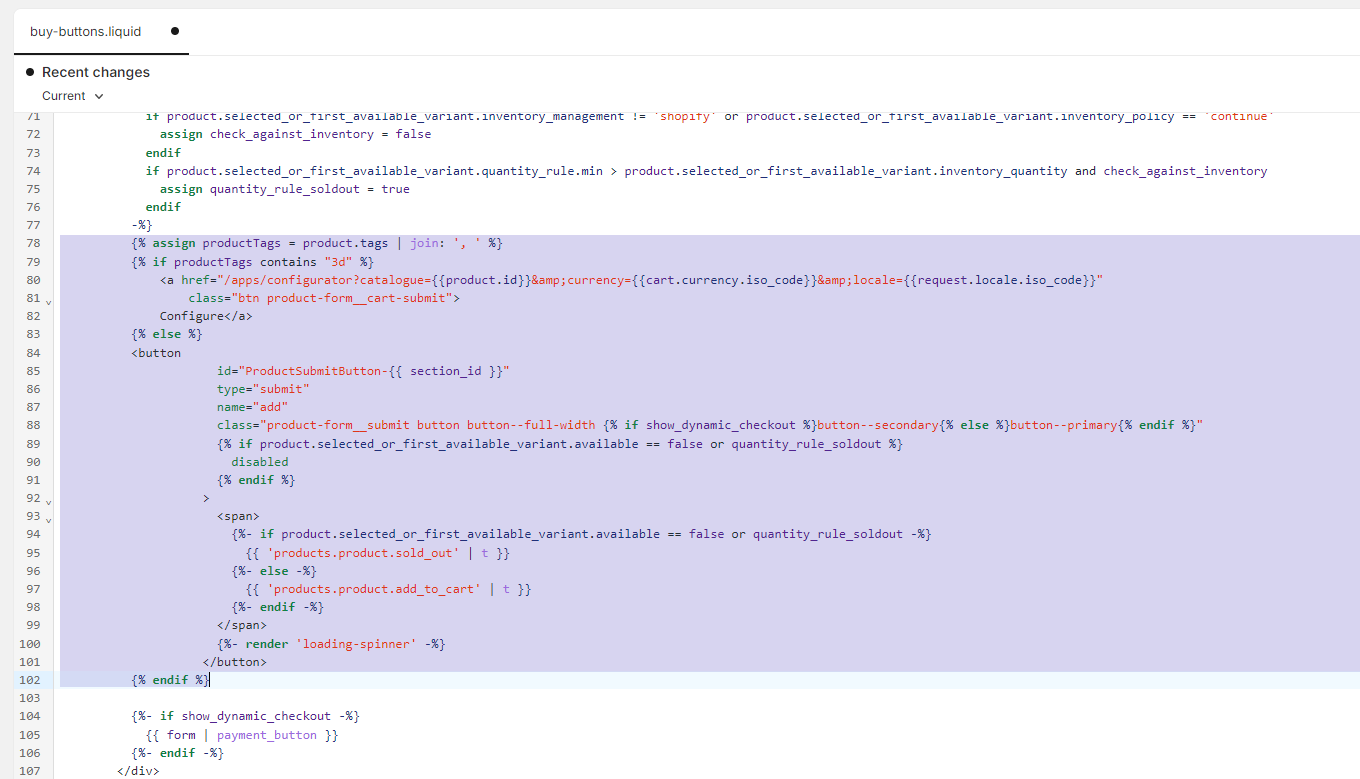
On the product page, you will see that the "add to cart" button is replaced with the "configure" button.
Adding Configuration Details in The Shopping Cart
The following modification to the theme file, will add the configuration details and the thumbnail of the configuration to the cart.
Locate the theme file of the shopping cart page where all the cart items are rendered. This theme file or code block differs between themes, so the code or images we use below might show different results compared to your theme.
A good rule is to search for the following line to locate the shopping cart:
{% for item in cart.items %}
In the Dawn theme, it is located in the main-cart-items.liquid file on line 81.
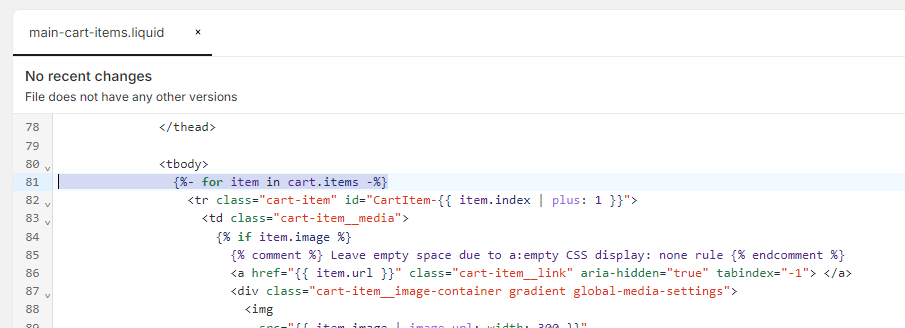
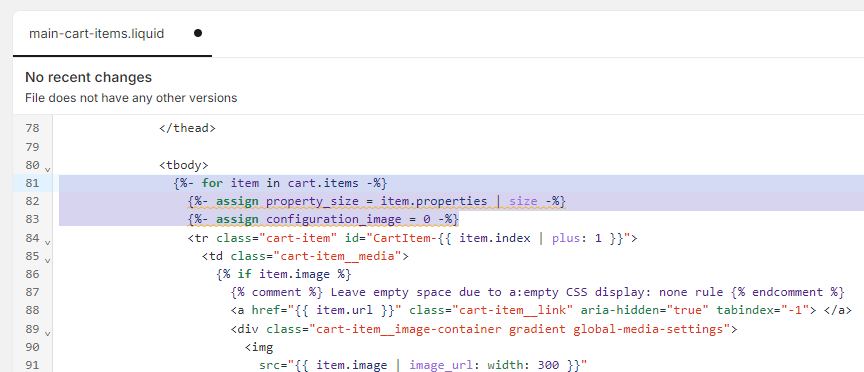
Add the following code after this line
{%- assign property_size = item.properties | size -%}
{%- assign configuration_image = 0 -%}
The file should look like this
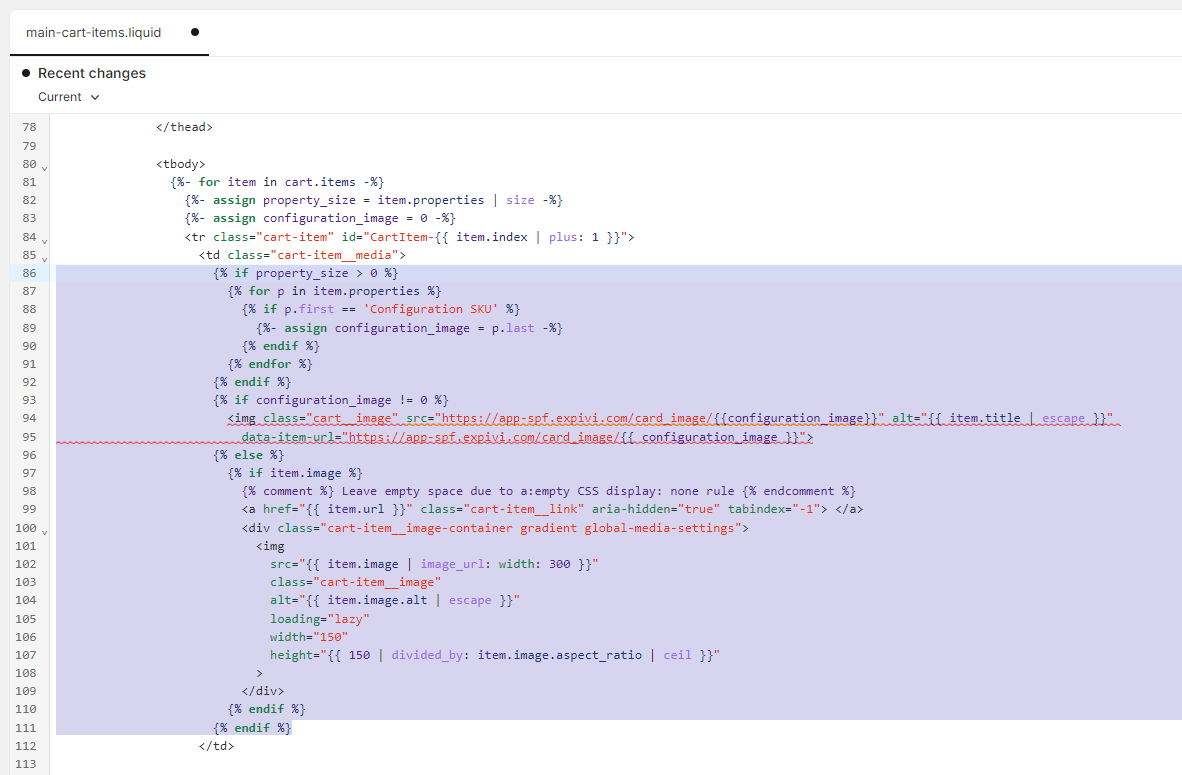
Next, the code to display the configuration thumbnail needs to be implemented. The code will look for the existence of the configuration image first. If it does not exist, the normal product image will be used.
The code:
{% if property_size > 0 %}
  {% for p in item.properties %}
    {% if p.first == 'Configuration SKU' %}
      {%- assign configuration_image = p.last -%}
    {% endif %}
  {% endfor %}
{% endif %}
{% if configuration_image != 0 %}
  <img class="cart__image" src="https://app-spf.expivi.com/card_image/{{configuration_image}}" alt="{{ item.title | escape }}" data-item-url="https://app-spf.expivi.com/card_image/{{ configuration_image }}">
{% else %}
  <!-- PUT THE ORIGINAL IMAGE CODE IN HERE //–>
{% endif %}
In the Dawn theme, it is located in the main-cart-items.liquid file on line 86.
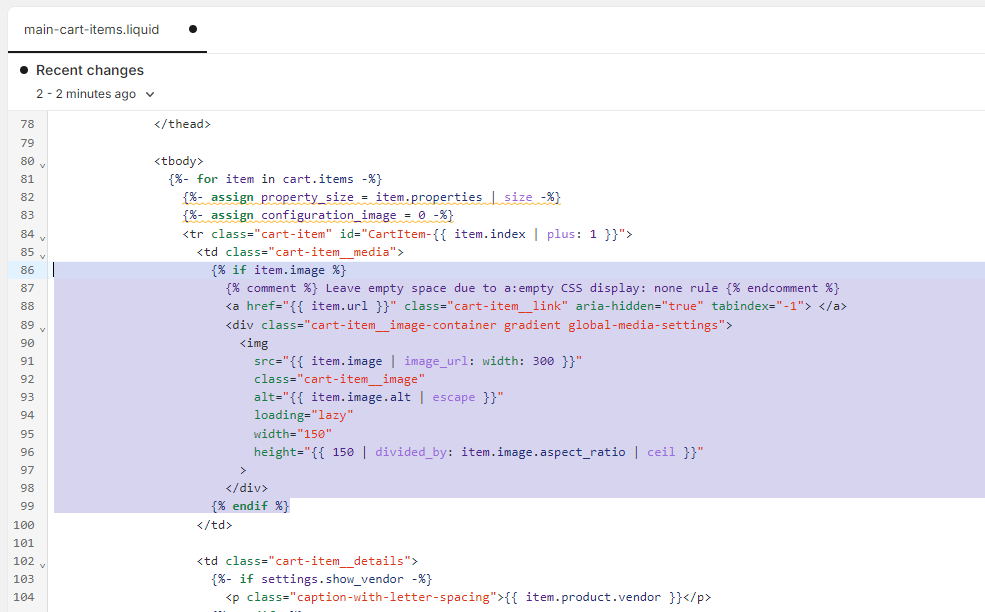
The file should look like this
Adding a Reconfiguration Link in The Shopping Cart
The following modification to the theme file, will add a reconfiguration link to each of the products in the cart, so customers can change the configuration of the products.
Reconfiguring a product will create a new variant if the add to cart behaviour is set to "Create new variant on existing Shopify product". Adding the modified product to the cart, will add a new product to the cart instead of replacing the original configured product.
If the add to cart behaviour is set to "Create an Expivi product replica for each configuration", the reconfigured product will replace the original configured product in the cart.
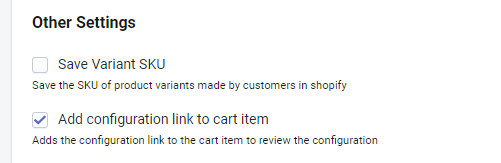
Go to the Expivi app settings and check the "Add configuration link to cart item" under the "Other Settings" section
Next, the code to make a clickable reconfiguration link needs to be added. Locate the theme file which contains the lines
{%- else -%}
{{ property.last }}
{%- endif -%}
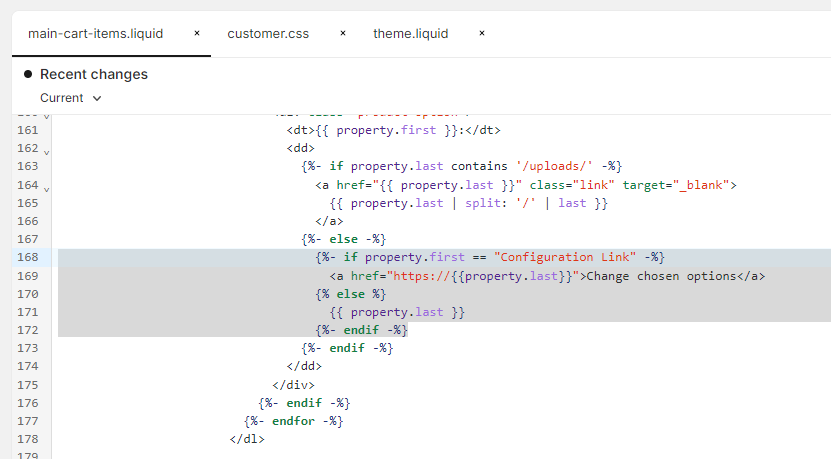
In the Dawn theme, it is located in the main-cart-items.liquid file on line 167.
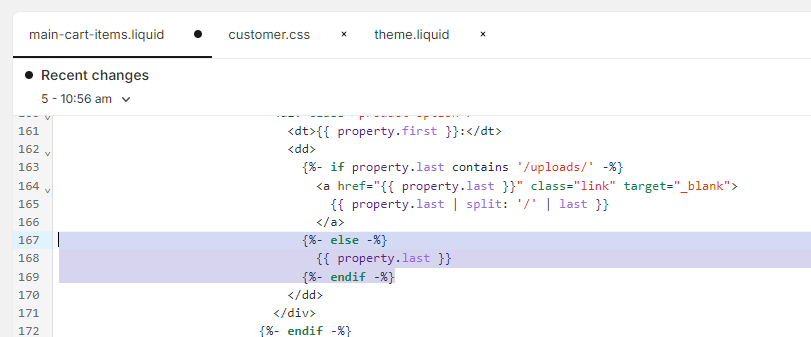
Add the following code
{%- if property.first == "Configuration Link" -%}
<a href="https://{{property.last}}">Change chosen options</a>
{% else %}
{{ property.last }}
{%- endif -%}
The file should look like this
Fixing The Uploaded Image Link in The Order Details
If you are using Expivi's image upload feature for your 3D products, you will see a link to the uploaded image in the order details.
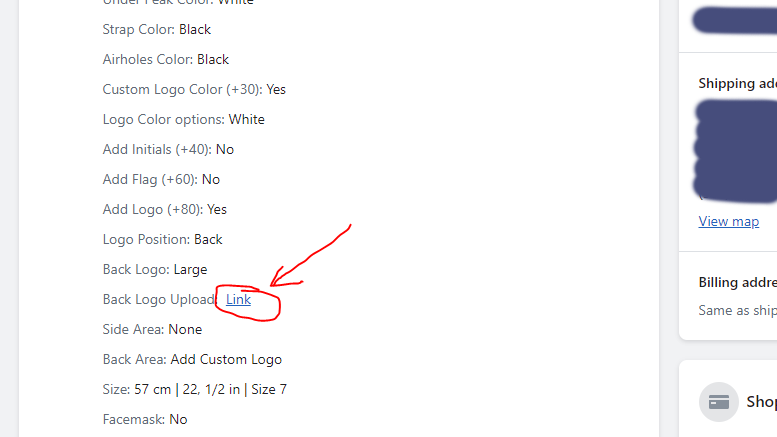
Unfortunately, this will lead to a broken link, because parameters are added to the image URL, so we need to add custom code to strip these parameters, so that the image URL will work again.

Make sure the following JS code is added to the page with Expivi's 3D configurator on it.
function saveConfiguration() {
    return expivi.saveConfiguration(512, 512);
}

function createVariant(savedBundle) {
    return new Promise(function (resolve, reject) {
        $.ajax({
            type: 'POST',
            url: '/apps/configurator',
            data: JSON.stringify({
                configuration: savedBundle.configured_products,
                productId: shopifyProductId
            }),
            contentType: 'application/json; charset=utf-8',
            dataType: 'json',
        }).done(function(createResult) {
            createResult.configuredProduct = savedBundle.configured_products[0];
            resolve(createResult);
        }).fail(reject);
    });
}

function fixLinkAttributes(createResult) {
    var matchParameters = /(.*)\s(?:@offset:)(.*)(?:;).*(?:@rotation:)(.*)(?:;).*(?:@scale:)(.*)(?:;)/i;
    var optionKeys = Object.keys(createResult.options);
    optionKeys.forEach(function(key) {
        var value = createResult.options[key];
        if (!/.*(@offset).*(@rotation).*(@scale)/.test(value)) {
            return;
        }

        var matches = value.match(matchParameters);
        matchParameters.lastIndex = 0;
        if (matches.length === 5) {
            createResult.options[key] = matches[1];
            createResult.options['_' + key + '_offset'] = matches[2];
            createResult.options['_' + key + '_rotation'] = matches[3];
            createResult.options['_' + key + '_scale'] = matches[4];
        }
    });
    return createResult;
}

function addToCart(createResult) {
    return new Promise(function (resolve, reject) {
        let addJsResponse = {
            quantity: 1,
            id: createResult.variant_id,
            properties: createResult.options,
        };

        $.ajax({
            type: 'POST',
            url: '/cart/add.js',
            data: JSON.stringify(addJsResponse),
            contentType: 'application/json; charset=utf-8',
            dataType: 'json',
        }).done(resolve).fail(reject);
    });
}

window.xpv_hooks_add_to_cart = function(context, event) {
    $button = $(context);
    shopifyProductId = $button.data('productId');

    // Disable button
    if ($button[0].hasAttribute('disabled')) {
        return false;
    }
    event.preventDefault();
    $button.attr('disabled', 'disabled');
    $button.addClass('loading');

    return Promise.resolve()
        .then(function() {
            return saveConfiguration();
        })
        .then(function(result) {
            return createVariant(result);
        })
        .then(function(results) {
            return fixLinkAttributes(results);
        })
        .then(function(result) {
            return addToCart(result)
        })
        .then(function() {
            if ($button.data('url') !== 'NONE') {
                window.location.href = $button.data('url');
            }

            // Don't let expivi handle add to cart
            return false;
        })
        .catch(function (error) {
            $button.removeAttr('disabled');
            $button.removeClass('loading');
            throw error;
        });
}
Using Custom Fonts in The 3D Configurator
If your product has attributes that uses a font like text_to_image attribute, it is required to make the font available in your shop.
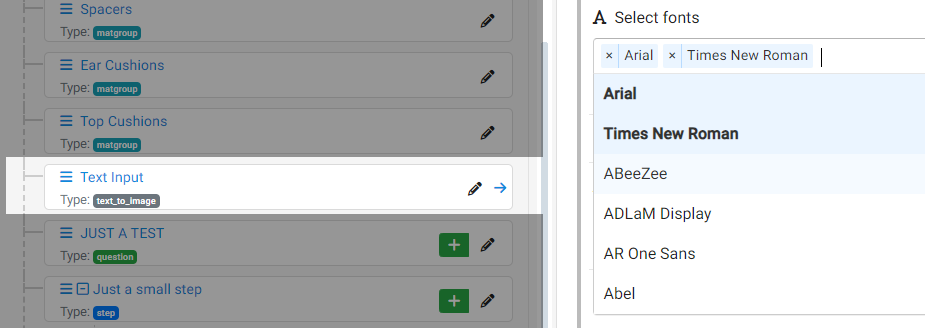
However, your customers will not see the fonts used on the 3D product, unless it is already installed on their devices. That is why it is important to import the fonts in your Shopify store, by editing the CSS code or using the HTML element <link rel="stylesheet">