Components
Components are the sub-items that can be grouped under a BOM part. Where a part represents a top-level item in the bill of materials, a component adds further detail. For example, individual screws, adhesives, or packaging materials that belong to that part.
How components relate to parts and attributes
A component does not stand alone. After you create a component, you link it to one or more parts through the Components section on each part's edit page (Parts). The part then records how many of that component it uses (the Quantity column in the Assigned Components table).
Components themselves do not carry attribute dependencies or calculation formulas, those belong on the part. Think of the component as the catalogue record of a physical item, and the part as the assembly step that calls for it.
Before you start
Make sure you have at least one Unit of Measure (UOM) set up (Units of measure (UOM)) before creating components. The UOM field is required.
Create a component
- Go to Bill of Materials / Components.
- Click Create.
- Fill in the General section:
| Field | What it does |
|---|---|
| Name | Translatable display name. Use the locale switcher to add translations. |
| Identifier | Unique machine-readable key (letters, digits, -, _, .; no spaces). |
| SKU | Optional stock-keeping unit code from your ERP or WMS. |
| Status | Active or Inactive. Only active components appear when linking to parts. |
| Quantity | Default quantity of this component. This is the component's own baseline; the linked quantity on the part's Assigned Components table overrides it at the part level. |
| UOM | The unit of measure (for example, pieces or kg). Required. |
| Description | Optional translatable description. |
| Thumbnail | Optional component thumbnail |
- Click Save.
Edit a component
Open the component. In addition to the General section, the edit view includes:
Attachments
Upload documents (datasheets, safety sheets) that belong to this component. Click Add new Document to open the upload form.
Link a component to a part
- Open the part you want to link this component to (Parts).
- Navigate to the Components section using the sidebar.
- Switch to the Remaining Components tab.
- Find the component in the list and select it to link it.
- In the Assigned Components tab, set the Quantity (the number of this component used per part) and save.
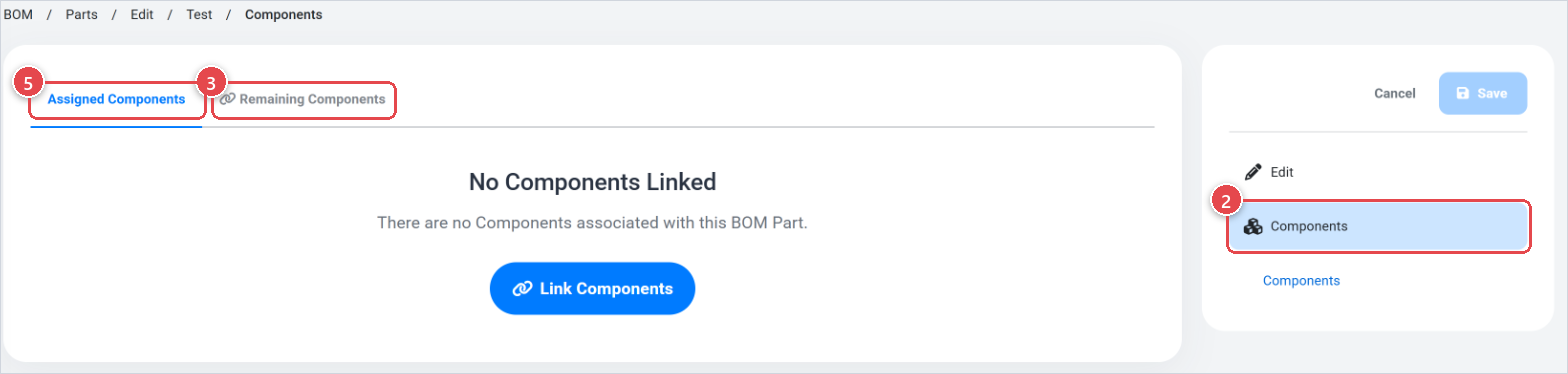
One component can be linked to multiple parts. Changes to the component itself (name, SKU, thumbnail) propagate automatically to all parts that use it.
Bulk add
To create several components at once:
- From the Components list, click Bulk Add.
- Enter a Name and Identifier for each row.
- Set the Quantity and UOM for each row.
- Click Save.
Bulk edit
To update multiple components at the same time:
- Select the components you want to edit using the checkboxes in the list.
- Click Edit in the action bar.
- Adjust Name, Identifier, SKU, and Status for each row.
- Click Save.
Give every component a meaningful identifier and SKU that matches your ERP or warehouse system before you link it to parts. If your system generates identifiers automatically, set them in bulk edit after import. Create your full component library first, then link components to parts. This avoids duplication and keeps your BOM consistent.