Materials
The Materials screen (Assets › Materials) stores the 3D material definitions that control how surfaces look inside the Expivi 3D viewer. A material is a set of shader properties (colour, roughness, metalness, reflections, normal maps, and more) that the rendering engine applies to the surface of a 3D model part. You create and edit materials here, and 3D visualizations reference them by 3D visualizations through (Material mapping).
How materials are used in Expivi
Materials are assigned to 3D model parts via the (Material mapping) screen. The material mapper connects a configurable attribute value (e.g. the "Oak" option on a Wood Finish attribute) to a specific material, so when a shopper picks that option the 3D viewer applies the correct surface appearance to the relevant part.
Browse materials
The left panel shows a folder tree. Click a folder to load its materials in the grid on the right. You can search by name with the search bar above the grid.
Create a material
- Click Add material in the page header.
- Enter a Name and choose a Type (Default material or PBR Material).
- Click Confirm. The material editor opens in the right panel.
Edit a material
Click any material card in the grid to open the editor on the right. The editor has two areas:
- 3D preview canvas (top-left): shows a live render of the material on a test geometry. Updates as you change properties.
- Property panels (right): grouped sections for each aspect of the material.
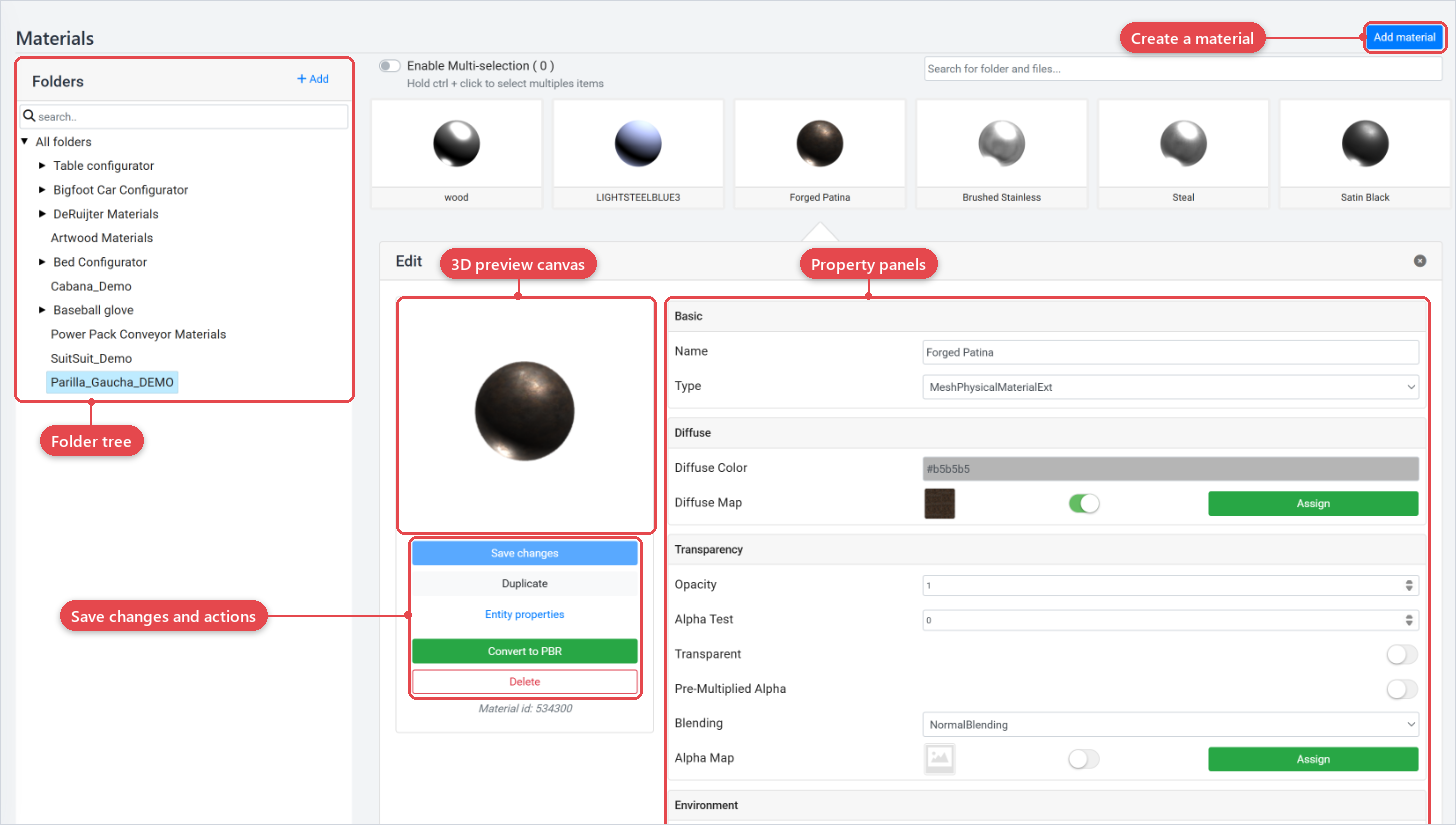
For a Default material the groups are Diffuse, Transparency, Environment, Reflection, Normals, Displacement / Parallax, and a few additional groups. Click Save changes in the preview panel. The button is enabled only when you have unsaved edits (state indicator changes). A spinner appears while saving.
Additional actions in the preview panel
- Duplicate: create a copy of the material (enabled when the material is saved and unmodified, or after saving).
- Entity properties: open a secondary panel with lower-level entity metadata.
- Convert to PBR: available on Default materials; converts them to the PBR type in place. These materials can only be used in a product with the Babylon beta render engine.
- Delete: permanently removes the material. This cannot be undone.
- Show material: Basic / Advanced (PBR only): toggle to show or hide advanced property groups.
Manage folders
The folder manager on the left panel lets you create, rename, and delete folders. You can drag materials from the grid onto a folder to move them. Multi-select is available with a toggle above the grid; hold Ctrl and click to build a selection.
Best practices
- Organise materials by product line or surface type (e.g.
Fabrics/,Wood/,Metals/) to keep large catalogues manageable. - Upload texture map images to (Textures) first, then assign them to the relevant material property slots (diffuse, normal, roughness map, etc.).
- After editing, verify the preview canvas shows the expected result before saving.
- Apply the materials to a matgroup in the 3d visualization so you can tweak the properties of your model on the model itself in the showcase.