Material mapping
A material mapper bridges the product configuration world and the 3D visualization world. It takes one configurable attribute (the axis a shopper selects from, e.g. "Wood Finish") and maps each of its values ("Oak", "Walnut", "White") to a specific 3D material. When the shopper picks "Oak", the viewer automatically applies the Oak material to the correct model parts.
Material mappers are listed under Mapping › Material.
How it fits together
- A configurable attribute has a list of selectable values.
- A material mapper is created for that attribute.
- In the mapper's Mapping section you connect each attribute value to a material from the (Materials) library.
- A (Visualization mapping) then references the material mapper (through material groups) so the viewer knows which model part to update.
Create a material mapper
-
Go to Mapping › Material and click Create.
-
Fill in the General section:
Field What it does Name A human-readable label for this mapper (shown in the list and in the visualization mapper). Identifier A unique machine-readable key auto-generated from the name. You can edit it before first save; it cannot change once other records reference it. Status Active or Inactive. Inactive mappers are ignored by the viewer. Attribute The configurable attribute whose values you want to map. Only attributes of type "attribute value list" are selectable. Description Optional notes for your team. -
Click Save. The mapper is created and you are taken to the edit screen, where the Mapping section becomes available.
Set up the mapping
The Mapping section appears on the edit screen (not on the create screen). It shows two columns side by side:
- Left column (Attribute Values): the values of the attribute you selected. These are the source entities.
- Right column (Materials): the available 3D materials from your (Materials) library. These are the target entities.
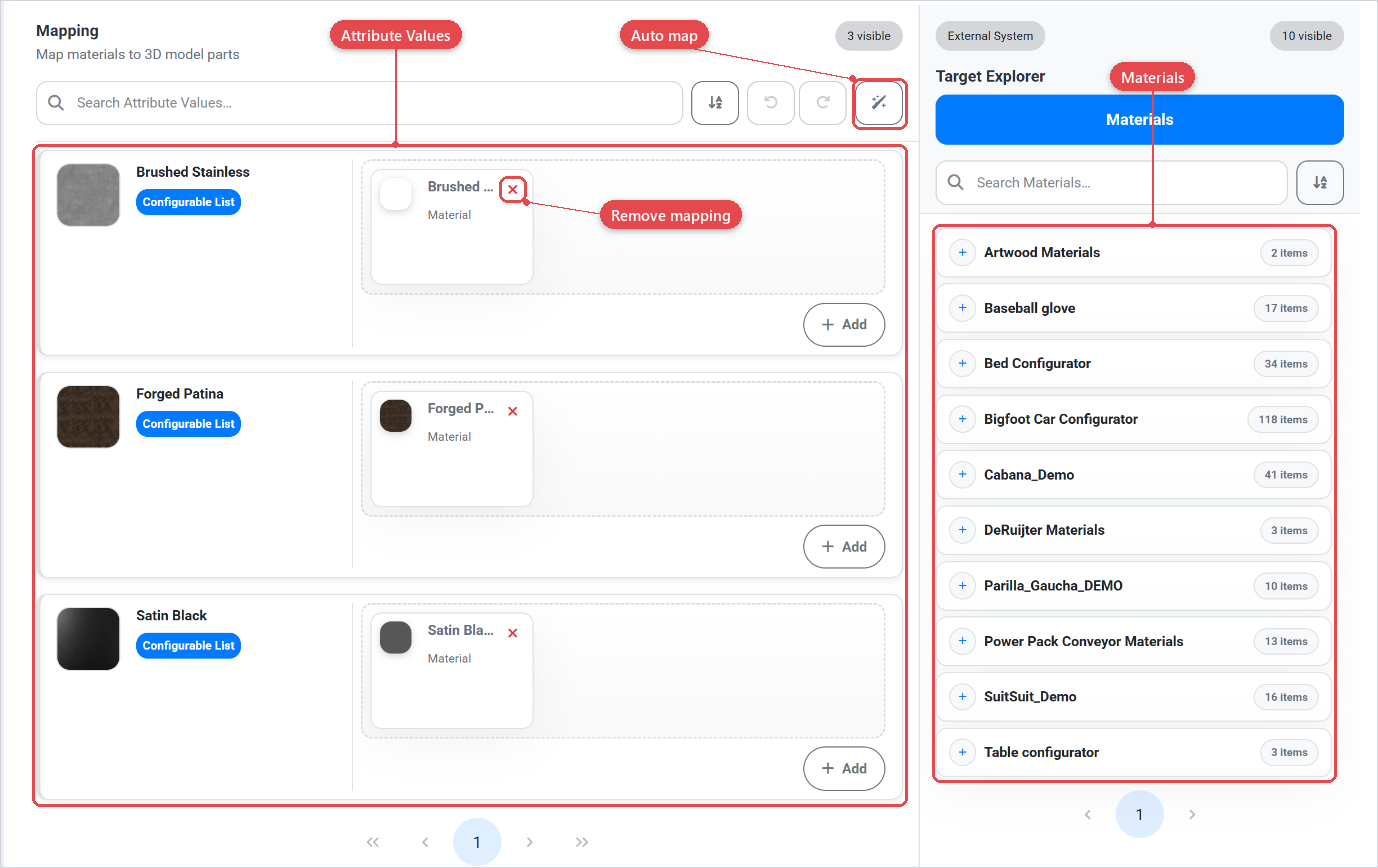
Map a value to a material
There are two ways to assign a material to an attribute value by hand. You can also let the backoffice suggest mappings with Auto map (see below).
Drag and drop: drag a material from the right column and drop it onto the attribute value row on the left. The mapping is saved immediately.
Inline picker: click the dropdown or the current mapping label on an attribute value row to open a searchable material picker. Select a material to apply it.
Materials are organised in a tree structure (material groups containing individual materials). You can browse the tree or search by name in the picker.
Remove a mapping
Click the unlink icon or the × button on a mapped row to remove the connection between that attribute value and its material. The material is not deleted, only the link is removed.
Auto map
Next to the search field, the mapping header has an Auto map button (wand icon). It suggests matches between attribute values and materials based on their names:
- Click Auto map.
- Review the suggestions. Each row shows the Source (attribute value) and the suggested Target (material).
- Use the Enable switch to turn off any suggestion you don't want.
- Confirm to apply the enabled suggestions.
If there's nothing to suggest, a message says so. Use Undo and Redo in the same header to reverse or reapply changes.
Auto map works best when attribute values and materials use similar names (for example, value "Oak" and material "Oak"). Consistent naming saves a lot of manual mapping.
Find and filter mappers
The mapper list supports:
- Search by id, name, or identifier.
- Filter by Attribute: pick an attribute to show only the mappers that use it.
- Filter by Status: select Active or Inactive to narrow the list.
- Sort by Name, Identifier, or Status.
Expand a row in the list to see its Description, Created, and Updated timestamps without opening the edit screen.
Best practices
- Create one material mapper per configurable attribute that drives surface changes in the 3D viewer. Avoid re-using a single mapper across unrelated attributes.
- Name materials and attribute values consistently (e.g. both named "Oak") to make the mapping obvious and reduce errors.
- Set the status to Inactive while you are building out a new mapper, then switch to Active once all values are mapped and verified.
- Always verify the mapping in the 3D viewer (via the product preview) after making changes.