Visualization mapping
A visualization mapper connects a product to a 3D visualization. Customers only choose catalog attribute values and never see the 3D options. The mapper translates those choices into the 3D scene behind the scenes: which material group gets which material, which 3D option is active, and where connected modules snap into place. Without a mapper, the viewer doesn't know that picking "Oak" for the Wood finish attribute should change the material of the frame.
Visualization mappers are listed under Mapping › Visualization.
How it fits together
- You have a product with catalog attributes, and a 3D visualization with 3D options, material groups and offset groups.
- You create a visualization mapper, selecting that product and visualization.
- In the mapper's sections you link catalog attributes to material groups or 3D attributes, and connection modules to snapping points.
- The viewer reads the mapper at runtime to update the scene when a shopper makes selections.
Create a visualization mapper
-
Go to Mapping › Visualization and click Create.
-
Fill in the General section:
Field What it does Name A human-readable label shown in the list and referenced elsewhere. Identifier A unique machine-readable key. Auto-generated from the name; editable before first save. Status Active or Inactive. Inactive mappers are not applied by the viewer. Product The product offer this mapper belongs to. Visualization The 3D visualization whose material groups, 3D attributes and snapping points you want to map to. Description Optional notes for your team. -
Click Save. You are taken to the edit screen where the two mapping sections become available.
Set up the mapping
Attributes section ("Map to Attributes")
This section is where catalog attributes drive the 3D scene. The list on the left shows the product's catalog attributes (Attributes). You link each one to a target in the 3D visualization:
| Target | When to use |
|---|---|
| Material Groups | The attribute changes a material, for example "Fabric". The attribute needs a material mapping first (Material mapping). The material chosen by the customer is then applied to the linked material group (Material groups). |
| Attributes (3D) | The attribute changes a 3D option, for example which part is shown. Link it to the matching 3D attribute (3D visualization attributes), then map its values (see below). |
If you try to link an attribute without a material mapping to a material group, the backoffice shows "Configure a material mapper for this attribute first."
To link an attribute:
- Find the attribute in the list.
- Select the target from the dropdown on the row, or drag a target from the right panel onto the row.
- The row now shows the linked target.
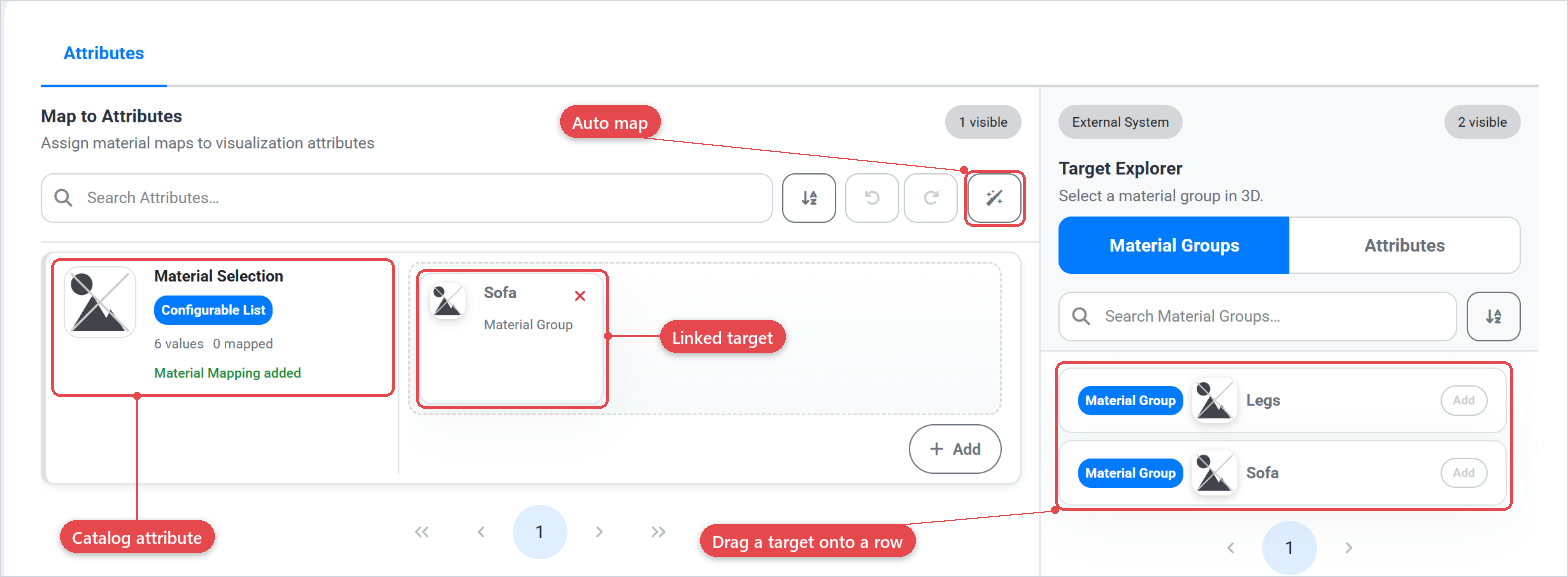
To map values: click a linked attribute row. A tab opens, titled Map to Values of followed by the attribute name. Link each catalog attribute value to the matching 3D value. For example, the value "With armrests" maps to the 3D option that shows the armrest parts. Close the tab with the × on its label when you're done.
To remove a link, click the unlink or × button on the row.
Connection Modules section ("Map to Connection Modules")
This section links the product's connection modules (Dependencies) to 3D snapping points: offset groups marked as Connector on the visualization (Offset groups). When a shopper adds a connectable module, the viewer uses these mappings to place it at the correct snapping point.
The list shows the product's connection modules. Link each one to a snapping point by:
- Selecting the snapping point from the dropdown on the connection module row.
- Dragging a snapping point from the right panel onto the row.
Each snapping point can be linked to only one connection module.
Auto map
The attribute and value mapping lists have the same Auto map button (wand icon) as the material mapper. It suggests matches based on names. Review the list, turn off unwanted suggestions with the Enable switch, and confirm. Use Undo and Redo to reverse or reapply changes. See Material mapping for the full steps.
Find and filter mappers
The mapper list shows Name, Identifier, Product, Visualization, and Status columns. You can:
- Search by name or identifier using the search box.
- Sort by Name, Identifier, or Status.
Expand a row to see its Description, Created, and Updated timestamps.
Best practices
- Create one visualization mapper per product–visualization combination. If the same product has multiple 3D models for different contexts, create a separate mapper for each.
- Set Status to Inactive while building the mapper so the viewer is not affected by incomplete mappings.
- Map every attribute that should affect the 3D scene before switching to Active. Unmapped attributes are ignored by the viewer. That is not an error, but the model stays unchanged when the customer picks those values.
- Use the Preview button in the sidebar to validate the mapping in a live session before publishing the product.
- Set up the material mapping (Material mapping) before you link an attribute to a material group. The material groups themselves can stay empty or hold a single default material.